Vegan Candied Yams
Whether you consider them a dessert or a side dish, candied yams are a Thanksgiving staple. These vegan candied yams are made deliciously crispy and chewy, and they are a perfect addition to the holiday table.
I’m going to be honest – I never really cared for candied yams. Overly sweet and sometimes mushy sweet potatoes or yams weren’t not exactly my first choice on Thanksgiving.
But as I get older, and now certainly being vegan, I can see why they have maintained their spot on the holiday dinner table. The sweet and chewy texture of the candied yams add a much needed contrast to all the other extremely savory foods of the holidays, like mashed potatoes and gravy.
Adding these buttery sweet, vegan candied yams to your plate is just what you need to cut through all the salt and herbs.
(By the way, read this if you ever wanted to know the difference between sweet potatoes and yam. It’s possible I may have actually made vegan candied sweet potatoes… )
How to make vegan candied yams
First, preheat the oven to 350°F and grease a casserole pan or cast iron pan. Using a cast iron pan like I did makes them extra chewy and crispy on the edges.
Wash and peel the yams (or sweet potatoes), then use a 3.5mm mandoline if you have one to thinly slice the yams into disks. Keeping the disks thin is key for the candied yams to come out crispy and chewy, and not soft and mushy.
Arrange the slices into the pan in even layers. Note that if you want to add marshmallows, layering them on now will only result in completely melted marshmallows.
In a small saucepan, add a full stick of vegan butter (1 cup or 8 tbsp), ½ cup maple syrup, ½ cup brown sugar, 1 tsp cinnamon, and 1 tsp salt. Whisk on low-medium heat until the butter has fully melted. Remove from the heat and add the 2 tsp of vanilla extract.
Carefully pour the butter mixture over the pan of yams, coating each layer. Cover the pan with foil and bake for 60 mins total.
Halfway through, remove the pan from the oven and baste and stir the yams. Cover with foil again and bake for the remaining 30 minutes.
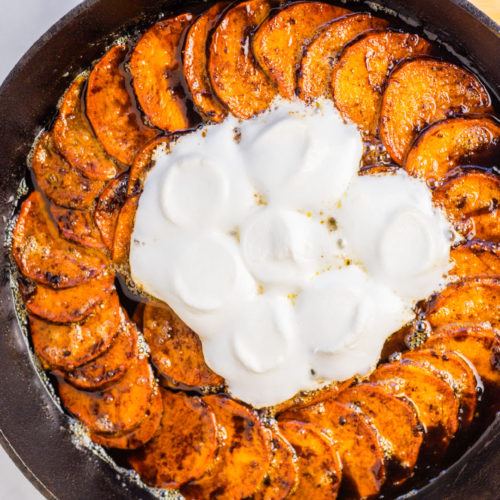
For the last 3 minutes, remove the pan from the oven and add a layer of vegan marshmallows on top of the yams (optional). Return the pan back to the oven and let it bake for only a couple of minutes.
Finally, remove the pan from the oven and let cool for at least 5 minutes before serving.

Vegan Candied Yams
Ingredients
- 3 large yams peeled and sliced thinly
- 8 tbsp or 1 stick of vegan butter
- 1 tsp cinnamon
- ½ cup brown sugar
- ½ cup maple syrup
- 2 tsp vanilla extract
- 1 tsp salt
- Vegan marshmallows optional
Instructions
- Preheat oven to 350°F. Grease a casserole dish or cast iron pan.
- Peel and slice the yams into thin disks, using a mandolin if you have one. The thinner you make them, the crispier and chewier they come out. Layer the disks of yam in the baking pan.
- In a medium saucepan, melt a stick or ½ cup of vegan butter on low heat. Slowly whisk in all the spices minus the vanilla extra, stirring constantly. Turn off the heat and whisk in the vanilla extract.
- Pour the melted butter mixture over the yams, coating the layers. Cover the pan with foil.
- Place the pan in the oven and bake for 1 hour total, basting and stirring halfway through. The melted butter mixture should get syrupy and caramelized around the yams. If using marshmallows, add one layer on top of the yams for the last 3-4 minutes.
- Let cool for 5 minutes before serving!
Notes
Amazon Affiliate links are used on this page at no extra cost to you.